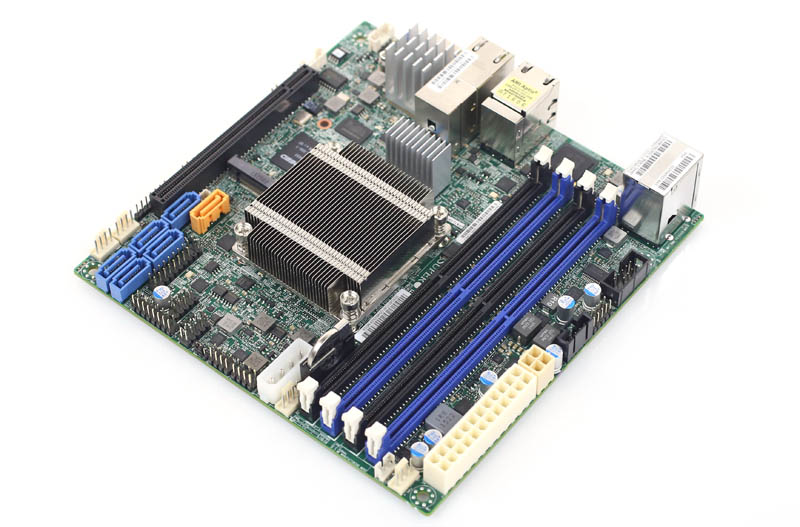
My homelab server uses a Supermicro X10SDV-6c-TLN4F motherboard that does not come with a CPU fan because it's meant to be screwed into a 1u chassis with its own fans. There's a low heatsink on the CPU to keep it cool using the chassis fans. The X10SDV-6c+-TLN4F does have a little CPU fan on the heatsink but was not available at the webshop where I bought the homelab server.
Silence
I did not buy myself a 1u chassis but a Supermicro Super-chassis CSE-721TQ-250B micro tower. This nice steel chassis offers a bit more storage options and thanks to the huge fan in the back, it's near silent.
This fan is mostly there to keep the four 3,5" drivebays cool and it's placed too high on the back of the chassis to add a significant airflow over the tiny heatsink on the CPU. With all the extra space around and above the heatsink, it gets barely any cooling at all.
Heat
The low heatsink requires a lot of moving air to keep the CPU at a reasonable temperature. For example: Using no fan on the CPU heatsink means I must finish my calculations within three minutes or the CPU moves into thermal shutdown range. This makes using the little server no fun. A single Windows installation makes the CPU overheat and causes the whole server to power off. My collegue already warned me about this before I bought the server so I knew I had to create more airflow over the heatsink.
Old stuff
Because I like pragmatic solutions, I decided to use a fan I had lying around since that's the cheapest and fastest solution. A bigger fan can move the same amount of air while making less RPM. So I grabbed the biggest PWM fan from the drawer filled with old computer stuff. It was actually a boxed cooler of some sort.
I don't remember ever owning an AMD desktop but I sure was happy to find this fan.
The attached heatsink is far to big to be mounted on the X10SDV motherboard so that had to go. Someday I may need it, so it's back in the drawer. Yes, I keep way to much junk. But look, sometimes it's very usefull to keep a heap of old stuff!
Let it fly
Having selected a big fan, there's no way to mount it on the tiny heatsink on the motherboard. I decided to add to the "front-to-back" airflow and keep some hot components near the CPU cool too. I suspended the fan in a diagonal manner, shown in the picture below.
That's right, the fan is hanging from the drivecage with two tie-wraps. Some times I fear one of the cables will end up in the blades but so far, none have. The fan pushes air around and into the heatsink and up the backside of the chassis, where it's extracted by the main case fan.
Cool and silent
So does it work? Yes it does! It keeps the CPU nice and cool and it adds some airflow over the rest of the components on the motherboard near the CPU. The NVMe SSD, BMC and the network controller get to experience a nice cool breeze.
FAN1 is the CPU fan and FAN2 is the case fan. Both are BIOS controlled and spin up when needed. I've never actually heard the fans spin up during use. Just once during testing (blowing hot air into the chassis with a hair dryer to make sure it worked).
21 March 2017
05 September 2016
Building a vSphere lab using ESXi linked clones
Update: William Lam has posted the ultimate nested homelab deployment script. I highly recommend it! I'll leave this blogpost up for historical sake but any and all information in it has been superseeded with the script mentioned above.
--------Original post-----------
When I'm setting up a nested vSphere lab, I don't wont to spend a lot of time doing the actual setup and start playing as soon as possible. Up until now I've used the ESXi appliance distributed by William Lam. My current workflow looks like this:
With a simple PowerShell script it is possible to deploy the OVF, add some advanced parameters to the VMX and have a working nested ESXi after the initial boot. All in one simple "wizard" like experience.
Most of the waiting time is used to deploy the OVF itself so I thought to myself: why not shorten the time needed to set up a nested lab! And if I do so using linked clones, I get the shortest deployment time possible, since it's just a thin clone. It should be possible since the script imports the same OVF multiple times anyway. I'll try to import the OVF once, make a snapshot and use the snapshot as the base template for the linked clones. Once the linked clone is created I'll add the advanced parameters to the VMX and get the nested lab off and running! So the new workflow should look like:
Unfortunately it's not possible to make a linked clone using the vSphere Web Client. PowerCLI to the rescue! With the cmdlet New-VM we should be able to make a new virtual machine out of an existing snapshot. So for this to work, you'll need to import William Lam's nested ESXi appliance OVA and make one snapshot. Be sure to skip all the OVF customization since we'll do that later.
After taking the snapshot, we can see the virtual machine files and the snapshot in the datastore browser. The main VMDK that contains the ESXi install itself is about 540MB large. The snapshot delta file contains no data so that's nice and small. The new clone ends up taking under 3MB. As soon as you start it up, it will grow a bit but only the new written blocks are kept in the snapshot delta file.
Since I set up most of my labs the same way, there are some entries added to the script variables that don't change between script runs. The only variable that has to be entered into the clone script each and every time is the number of nested ESXi hosts I want. This changes every time I set up a lab so I've used a Read-Host prompt for that. I mostly use VSAN or some type of shared storage for the lab, so I set the createvmfs variable to false. If I don't use VSAN, I usually set up a Starwind Virtual SAN. It's an easy to set up iSCSI target with a free 2-node license for many IT professionals. It also offers VAAI support and some storage acceleration, so that's nice.
Creating one ESXi clone takes about 30 seconds until boot. During the first boot it runs through some configuration scripts and is ready to be used in under two minutes.
Next up will be a blogpost on how to automate a vCenter deployment into this lab and a script to add the nested ESXi hosts to the fresh vCenter server. Adding all of these together should give you a quick and easy way to deploy a nested vSphere lab.
New script (for the linked clones)
Old script (for deploying the OVF)
--------Original post-----------
When I'm setting up a nested vSphere lab, I don't wont to spend a lot of time doing the actual setup and start playing as soon as possible. Up until now I've used the ESXi appliance distributed by William Lam. My current workflow looks like this:
- Import OVF to vCenter using OVF customization
- Boot the imported VM so the parameters get picked up by the guest OS
- Done!
With a simple PowerShell script it is possible to deploy the OVF, add some advanced parameters to the VMX and have a working nested ESXi after the initial boot. All in one simple "wizard" like experience.
Most of the waiting time is used to deploy the OVF itself so I thought to myself: why not shorten the time needed to set up a nested lab! And if I do so using linked clones, I get the shortest deployment time possible, since it's just a thin clone. It should be possible since the script imports the same OVF multiple times anyway. I'll try to import the OVF once, make a snapshot and use the snapshot as the base template for the linked clones. Once the linked clone is created I'll add the advanced parameters to the VMX and get the nested lab off and running! So the new workflow should look like:
- Make linked clone
- Add advanced parameters to the VMX
- Boot the imported VM so the parameters get picked up by the guest OS
- Done!
After taking the snapshot, we can see the virtual machine files and the snapshot in the datastore browser. The main VMDK that contains the ESXi install itself is about 540MB large. The snapshot delta file contains no data so that's nice and small. The new clone ends up taking under 3MB. As soon as you start it up, it will grow a bit but only the new written blocks are kept in the snapshot delta file.
Since I set up most of my labs the same way, there are some entries added to the script variables that don't change between script runs. The only variable that has to be entered into the clone script each and every time is the number of nested ESXi hosts I want. This changes every time I set up a lab so I've used a Read-Host prompt for that. I mostly use VSAN or some type of shared storage for the lab, so I set the createvmfs variable to false. If I don't use VSAN, I usually set up a Starwind Virtual SAN. It's an easy to set up iSCSI target with a free 2-node license for many IT professionals. It also offers VAAI support and some storage acceleration, so that's nice.
Creating one ESXi clone takes about 30 seconds until boot. During the first boot it runs through some configuration scripts and is ready to be used in under two minutes.
Next up will be a blogpost on how to automate a vCenter deployment into this lab and a script to add the nested ESXi hosts to the fresh vCenter server. Adding all of these together should give you a quick and easy way to deploy a nested vSphere lab.
New script (for the linked clones)
1 2 3 4 5 6 7 8 9 10 11 12 13 14 15 16 17 18 19 20 21 22 23 24 25 26 27 28 29 30 31 32 33 34 35 36 37 38 39 40 41 42 43 44 45 46 47 48 49 50 51 52 53 54 55 56 57 58 59 60 61 62 63 64 65 66 | # Script by Hans Lenze Kaper - www.kaperschip.nl # heavily inspired by William Lam - www.virtuallyghetto.com # Variables for connecting to vCenter server $viServer = "192.168.2.200" $viUsername = "root" $viPassword = "password" # Variables for the lab host $sourceVM = 'nestedESXi-template' $sourceSnapshot = '20160904' $destDatastore = 'SSD1' $destVMhost = "192.168.2.230" $numberNestedESXiInput = read-host -Prompt "How many nested ESXi hosts do you want to deploy?" # Variables for the nested lab $iprange = "192.168.10" $netmask = '255.255.255.0' $gateway = '192.168.10.254' $dns = '192.168.10.254' $dnsdomain = 'test.local' $ntp = '192.168.2.254' $syslog = '192.168.10.100' $password = 'password' $ssh = "True" $createvmfs = "False" # Creates a Datastore1 VMFS volume on every host if true # Actions - pay attention when making changes below - things may break # $numberNestedESXi = (100 + $numberNestedESXiInput) . 'C:\Program Files (x86)\VMware\Infrastructure\vSphere PowerCLI\Modules\VMware.VimAutomation.Core\VMware.VimAutomation.Core.ps1' Connect-VIServer -Server $viServer -User $viUsername -Password $viPassword 101..$numberNestedESXi | Foreach { $ipaddress = "$iprange.$_" # Try to perform DNS lookup try { $vmname = ([System.Net.Dns]::GetHostEntry($ipaddress).HostName).split(".")[0] write-host "Resolved $vmname" } Catch [system.exception] { $vmname = "vesxi-$ipaddress" write-host "Set VMname to $vmname" } # Make my nested ESXi VM already! Write-Host "Deploying $vmname ..." $vm = new-vm -Name $vmname -Datastore $destDatastore -ReferenceSnapshot $sourceSnapshot -LinkedClone -VM (get-vm $sourceVM) -vmhost $destVMhost # Add advanced parameters to VMX New-AdvancedSetting -Name guestinfo.hostname -Value $vmname -Entity $vm -Confirm:$false New-AdvancedSetting -Name guestinfo.ipaddress -Value $ipaddress -Entity $vm -Confirm:$false New-AdvancedSetting -Name guestinfo.netmask -Value $netmask -Entity $vm -Confirm:$false New-AdvancedSetting -Name guestinfo.gateway -Value $gateway -Entity $vm -Confirm:$false New-AdvancedSetting -Name guestinfo.dns -Value $dns -Entity $vm -Confirm:$false New-AdvancedSetting -Name guestinfo.dnsdomain -Value $dnsdomain -Entity $vm -Confirm:$false New-AdvancedSetting -Name guestinfo.ntp -Value $ntp -Entity $vm -Confirm:$false New-AdvancedSetting -Name guestinfo.syslog -Value $syslog -Entity $vm -Confirm:$false New-AdvancedSetting -Name guestinfo.password -Value $password -Entity $vm -Confirm:$false New-AdvancedSetting -Name guestinfo.ssh -Value $ssh -Entity $vm -Confirm:$false New-AdvancedSetting -Name guestinfo.createvmfs -Value $createvmfs -Entity $vm -Confirm:$false $vm | Start-Vm -RunAsync | Out-Null Write-Host "Starting $vmname" } |
Old script (for deploying the OVF)
1 2 3 4 5 6 7 8 9 10 11 12 13 14 15 16 17 18 19 20 21 22 23 24 25 26 27 28 29 30 31 32 33 34 35 36 37 38 39 40 41 42 43 44 45 46 47 48 49 50 51 52 53 54 55 56 57 58 59 60 61 | # William Lam # www.virtuallyghetto.com . "C:\Program Files (x86)\VMware\Infrastructure\vSphere PowerCLI\Scripts\Initialize-PowerCLIEnvironment.ps1" $vcname = "192.168.2.200" $vcuser = "root" $vcpass = "password" $ovffile = "%userprofile%\Desktop\Nested ESXi\Nested_ESXi_Appliance.ovf" $cluster = "VSAN Cluster" $vmnetwork = "Lab_network" $datastore = "SSD1" $iprange = "192.168.10" $netmask = "255.255.255.0" $gateway = "192.168.10.254" $dns = "192.168.10.254" $dnsdomain = "test.local" $ntp = "192.168.10.254" $syslog = "192.168.10.150" $password = "password" $ssh = "True" #### DO NOT EDIT BEYOND HERE #### $vcenter = Connect-VIServer $vcname -User $vcuser -Password $vcpass -WarningAction SilentlyContinue erver $vcenter -Confirm:$false $datastore_ref = Get-Datastore -Name $datastore $network_ref = Get-VirtualPortGroup -Name $vmnetwork $cluster_ref = Get-Cluster -Name $cluster $vmhost_ref = $cluster_ref | Get-VMHost | Select -First 1 $ovfconfig = Get-OvfConfiguration $ovffile $ovfconfig.NetworkMapping.VM_Network.value = $network_ref 190..192 | Foreach { $ipaddress = "$iprange.$_" # Try to perform DNS lookup try { $vmname = ([System.Net.Dns]::GetHostEntry($ipaddress).HostName).split(".")[0] } Catch [system.exception] { $vmname = "vesxi-vsan-$ipaddress" } $ovfconfig.common.guestinfo.hostname.value = $vmname $ovfconfig.common.guestinfo.ipaddress.value = $ipaddress $ovfconfig.common.guestinfo.netmask.value = $netmask $ovfconfig.common.guestinfo.gateway.value = $gateway $ovfconfig.common.guestinfo.dns.value = $dns $ovfconfig.common.guestinfo.domain.value = $dnsdomain $ovfconfig.common.guestinfo.ntp.value = $ntp $ovfconfig.common.guestinfo.syslog.value = $syslog $ovfconfig.common.guestinfo.password.value = $password $ovfconfig.common.guestinfo.ssh.value = $ssh # Deploy the OVF/OVA with the config parameters Write-Host "Deploying $vmname ..." $vm = Import-VApp -Source $ovffile -OvfConfiguration $ovfconfig -Name $vmname -Location $cluster_ref -VMHost $vmhost_ref -Datastore $datastore_ref -DiskStorageFormat thin $vm | Start-Vm -RunAsync | Out-Null } |
30 August 2016
In Win MS04 home server case
Out with the old
For some time I've been looking for a nice computer case to house my small homelab server. Finding a case that fits a mini-ITX motherboard, two 3,5" HDDs and a 2,5" SSD while omitting the PSU has been hard. So hard that I gave up. During my search I put the homeserver into a shoe box and for the past few months, the server has been running happily in it's bright red "case".
In with the new
One of the Dutch one-day offer sites offered an In Win MS04 with a 265W PSU with a 30% discount. I first came across this case when I was shopping for the SuperMicro Xeon-D based home server and thought it looked nice but a bit expensive. The discount and the fact that my colleagues were making fun of my makeshift bright red case made me decide to go for this offer. It arrived in a plain beige box with some tape and some foam to keep it save.
In case you don't know this case, here are some highlights:
- 4 hot swap drive bays
- Slim ODD bay
- internal 2,5" HDD bay
- mini-itx motherboard tray
- 265W 80+ bronze PSU
- 120mm PWM fan
- one low profile PCI-E slot
- power button with blue LED
Installation
Since I'm only replacing the case, the contents is still the old homelab management server. The removable motherboard tray made installing the motherboard a breeze. The screws for the motherboard were in a clearly labeled plastic bag. After installation of the motherboard, connecting all the wires for the frontpanel was easy. Only the front USB3.0 connector was a bit finicky since it required nimble fingers to get underneath the drive bays and push the connector to the board right-side up.
Minor issue with the cabling: the Pico-PSU molex connector to feed power to the backplane is a very, very tight fit. There's not enough slack in the cable to unplug the molex. A motherboard with a 24pin connector on the "north-end" won't have this issue though.
I like the drive trays that allow you to mount both 3,5" and 2,5" drives in a caddy (not simultaneously). One houses a 2,5" SSD and two others house a 3,5" HDD each.
In the end I think it's a nice case that will serve it's purpose well. For now I'm not using the included PSU because my 80W Pico-PSU delivers enough power with greater efficiency. Maybe I'll use the included PSU when I upgrade to another motherboard or maybe I won't.
Here you can see it humming along next to it's big brother. The 25W usage is just the management server running ESXi 6.0u2 and three VMs (VCSA, Xpenology and Server 2016).
23 August 2016
Homelab part 4: Suspending the lab
Since my homelab is just a playground to try and test things, there's no point it keeping it running when I'm not actively using it. I've decided to shut down or suspend the virtual machines that are running and make a script that saves the state of the lab so it all comes back when it's time to go play. I use a Windows virtual machine as a jumphost and ESXi as the hypervisor so I've chosen PowerCLI as the glue that sticks it all together.
The second script is used to store the running virtual machines into the CSV file and shut down the ESXi host.
As with all things in a homelab, these scripts are subject to change as soon as I think of something new. Suggestions are welcome!
The first script is used to start the homelab.
So this script starts the ESXi host using IPMI and loads the CSV file that contains the running virtual machines from last time and starts them as soon as the ESXi host is connected to vCenter.1 2 3 4 5 6 7 8 9 10 11 12 13 14 15 16 17 18 19 20 21 22 23 24 25 26 27 28 29 30 31 32 33 34 35 36 37 38 39 40 41 42 43 44 45 46 | #variables $ipmiCred = Get-Credential ADMIN $Ip = "192.168.2.229" $vcenterCred = get-credential root $vcenterserver = '192.168.2.200' $vmhost = '192.168.2.230' $PoweredOnVMspath = 'c:\temp\PoweredOnVMs.csv' #boot host using IPMI try { Get-PcsvDevice -TargetAddress $Ip -ManagementProtocol IPMI -Credential $ipmiCred | Start-PcsvDevice } catch { $ErrorMessage = $_.Exception.Message $FailedItem = $_.Exception.ItemName write-host "error connecting to IPMI: $faileditem $errormessage" } #load PowerCLI . 'C:\Program Files (x86)\VMware\Infrastructure\vSphere PowerCLI\Scripts\Initialize-PowerCLIEnvironment.ps1' #connect to vCenter server try{ Connect-VIServer -Server $vcenterserver -Credential $vcenterCred } catch{ write-host 'Connection to vCenter server failed' -ForegroundColor Red } #wait for the host to start up do { sleep 10 $ServerState = (get-vmhost $vmhost).ConnectionState } while ($ServerState -eq 'NotResponding') Write-Host "$vmhost is still booting" #load the list of VMs that were powered on last time try{ $PoweredOnVMs = Import-Csv -Path $PoweredOnVMspath } catch{ Write-Host 'Import CSV of powered on VMs failed' -ForegroundColor Red } #start VMs that were powered on last time try{ start-vm $PoweredOnVMs.name} catch{Write-Host 'VMs power on failed' -ForegroundColor Red} |
The second script is used to store the running virtual machines into the CSV file and shut down the ESXi host.
1 2 3 4 5 6 7 8 9 10 11 12 13 14 15 16 17 18 19 20 21 22 23 24 25 26 27 28 29 30 31 32 33 34 35 36 37 38 39 40 41 42 43 44 45 46 | #variables $vcenterCred = get-credential root $vcenterserver = '192.168.2.200' $vmhost = '192.168.2.230' $PoweredOnVMspath = 'c:\temp\PoweredOnVMs.csv' #load PowerCLI . 'C:\Program Files (x86)\VMware\Infrastructure\vSphere PowerCLI\Scripts\Initialize-PowerCLIEnvironment.ps1' #connect to vCenter server try{ Connect-VIServer -Server $vcenterserver -Credential $vcenterCred } catch{ write-host 'Connection to vCenter server failed' -ForegroundColor Red } #find powered on VMs try{ $PoweredOnVMs = get-vmhost $vmhost | get-vm | Where-Object{$_.PowerState -eq 'PoweredOn'} } catch{ write-host 'Failed to find Powered On VMs' -ForegroundColor Red} #export powered on VMs to CSV try{ $PoweredOnVMs | Export-Csv -Path $PoweredOnVMspath } catch { Write-Host 'failed to export CSV' -ForegroundColor Red} # shut it all down, start with VMs that have VMtools installed foreach ($PoweredOnVM in $PoweredOnVMs) { try{ Shutdown-VMGuest $PoweredOnVM.Name -Confirm:$false} catch{Suspend-VM $PoweredOnVM.Name -Confirm:$false}} write-host 'Shutting down VMs and waiting some minutes' -foregroundcolor Green #wait for the VMs to shut down or suspend do { start-sleep 10 $VMState = (get-vmhost $vmhost|get-vm) } while ($VMState.PowerState -eq 'PoweredOn') #wait a few more seconds start-sleep 15 #shut down the ESXi host write-host 'Shutting down ESXi host' try{Stop-VMHost $vmhost -Force -Confirm:$false | Out-Null} catch{Write-Host 'ESXi host shutdown failed' -ForegroundColor Red} |
As with all things in a homelab, these scripts are subject to change as soon as I think of something new. Suggestions are welcome!
17 August 2016
AHCI controller passthrough with a Supermicro Xeon-D motherboard
So someone asked me if it is possible to passthrough the onboard AHCI SATA controller from a Supermicro Xeon-D motherboard to a VM. Since I use ESXi, that's what I'll use to show you this. Hyper-V 2016 features discrete device assignment in the latest technical preview builds, you can try this with Hyper-V too. Maybe I'll do a blogpost on that some other time.
[10 feb 2021 - Update] This still works in ESXi 7.0.1 but the passtru.map has been placed in the subfolder /etc/vmware/.
I started by having a look in the list of devices that are available for passthough. The Lynx Point AHCI Controller was not on the list of devices since SATA controllers are unsupported for passthrough. Let's fix that!
Log in to your host using SSH or use the DCUI locally.
Find out the PCI ID using the following command:
esxcli storage core adapter list
Your onboard SATA controller is usually listed as vmhba0. The ID we're looking for is listed in the Description. So in this case, it's 0000:00:1f.2.
Enter the next command to find the PID. Substitute the PCI ID with your own ID if needed.
lspci -n | grep 0000:00:1f.2
After adding the PCI device to the VM, boot it to see the result.
In my case, the VM I added the controller to is a Windows 7 virtual machine. To show you the controller and the connected disks, I added a screenshot of the device manager. I have two Samsung 850 Pro SSDs connected to the onboard SATA controller.
Reminder: Since the files for the VM itself have to be stored somewhere, you'll need another storage device. In my case, all the VM files are stored on an NVMe SSD. This method can be used to create a dedicated storage VM with a number of hard drives. It's a great way to give a FreeNAS VM direct access to a number of SATA drives.
Many thanks to Hilko for showing me the commands in the "Energy efficient ESXi server" thread on got.tweakers.net. Most of this blogpost is a shameless copy of his post.
[10 feb 2021 - Update] This still works in ESXi 7.0.1 but the passtru.map has been placed in the subfolder /etc/vmware/.
I started by having a look in the list of devices that are available for passthough. The Lynx Point AHCI Controller was not on the list of devices since SATA controllers are unsupported for passthrough. Let's fix that!
Log in to your host using SSH or use the DCUI locally.
Find out the PCI ID using the following command:
esxcli storage core adapter list
Your onboard SATA controller is usually listed as vmhba0. The ID we're looking for is listed in the Description. So in this case, it's 0000:00:1f.2.
Enter the next command to find the PID. Substitute the PCI ID with your own ID if needed.
lspci -n | grep 0000:00:1f.2
In this case, the PID we're looking for is 8c02. Add this PID at the bottom of /etc/passthrou.map like so.
Edit: In ESXi 7.01, this file can be found here: /etc/vmware/passthru.map
Save your changes and reboot the ESXi host.
After the reboot, you'll be able to select the Lync Point AHCI controller.
So after this, follow the normal procedure for adding a passthrough device to a VM.
Mark the device for passthrough and reboot the host.
When the host is up again, edit the VM settings to add the PCI device.
After adding the PCI device to the VM, boot it to see the result.
In my case, the VM I added the controller to is a Windows 7 virtual machine. To show you the controller and the connected disks, I added a screenshot of the device manager. I have two Samsung 850 Pro SSDs connected to the onboard SATA controller.
Reminder: Since the files for the VM itself have to be stored somewhere, you'll need another storage device. In my case, all the VM files are stored on an NVMe SSD. This method can be used to create a dedicated storage VM with a number of hard drives. It's a great way to give a FreeNAS VM direct access to a number of SATA drives.
Many thanks to Hilko for showing me the commands in the "Energy efficient ESXi server" thread on got.tweakers.net. Most of this blogpost is a shameless copy of his post.
31 July 2016
Homelab part 3: Management
In my opinion, a homelab should be volatile. Most of my lab is used in a simple cycle:
- You think of something to try, test or wreck.
- You build it as fast as possible while cutting as little corners as you can in order to make sure the results are valid.
- Execute your test plan.
- Evaluate the results to see if they are as expected. Troubleshoot or repeat the tests as necessary.
- Decide if you need your setup for more tests. If yes, shut it down or safe. If in doubt or you no longer need the setup, delete all the bits.
In order to set up a lab as fast as possible, there are some parts of the lab I don't rebuild with every test. This is the management part of the lab. To make sure the management stuff doesn't get wiped, I put up a separate physical server just to host the management roles. So what are these roles?
- vCenter server for the deployment of templates and tracking of performance over longer periods of time. I also use the vSphere Web Client to manage the lifecycle of the virtual machines.
- Sexilog to collect logs and alerts and display them on a dashboard.
- A Windows virtual machine to use as an RDP jump box to the lab when I'm not at home. This is also the Windows server that runs all the PowerCLI/PowerShell scripts in the homelab.
- A virtual NAS to store ISOs, templates and random bits of data. This is also the primary data storage device in the house containing all the photos, documents and other important data.
The resources needed for these workloads are quite modest. This enables me to look at a low-power option that is affordable (usually, the nice low-power servers that have some grunt are costly. The Supermicro SYS-E200-8D for example). After a lot of contemplation I decided to try a very low cost option and see if I could make it work. I had 16GB DDR3 SO-DIMM and a PicoPSU lying around. That should be enough to run my management workloads. I went looking for a low-power motherboard with a few CPU cores so I wouldn't have to worry about CPU contention. Because of this reason, a quad core CPU was preferable to a dual core option.
I found an Asrock N3700-ITX and I decided to give it a shot. It looked a bit underpowered with a quad core Atom (Braswell) processor, passive cooling and four SATA ports. The N3700 provides a little higher turbo speed over the N3150. No idea if this really helps but the price difference is small enough to try. If I didn't have a PicoPSU, I'd have bought the Asrock N3150DC-ITX because it has a 12V DC input and comes with the appropriate 65W adapter.
The first attempts to get ESXi to run on the system were unsuccessful. Many thanks to Antonio Jorba for solving the problem. Deploying the vCenter appliance was simple enough once I figured out how to connect to the Host Client and such. An SSD stores all of the virtual machines and two connected 5TB disks take care of storage for the virtual NAS. Running just ESXi 6.0 idle with a single SSD connected uses 11W (balanced power management). The complete system with the disks and the virtual machines running uses around 25W. That equals about 50 euros a year in power if I leave it running 24/7. So it meets the requirements.
Shopping list:
I'm still looking for a nice case to put the board, SSD and two HDDs into. Something the size of an average shoe box would be perfect. If you have a good suggestion, let me know!
I found an Asrock N3700-ITX and I decided to give it a shot. It looked a bit underpowered with a quad core Atom (Braswell) processor, passive cooling and four SATA ports. The N3700 provides a little higher turbo speed over the N3150. No idea if this really helps but the price difference is small enough to try. If I didn't have a PicoPSU, I'd have bought the Asrock N3150DC-ITX because it has a 12V DC input and comes with the appropriate 65W adapter.
The first attempts to get ESXi to run on the system were unsuccessful. Many thanks to Antonio Jorba for solving the problem. Deploying the vCenter appliance was simple enough once I figured out how to connect to the Host Client and such. An SSD stores all of the virtual machines and two connected 5TB disks take care of storage for the virtual NAS. Running just ESXi 6.0 idle with a single SSD connected uses 11W (balanced power management). The complete system with the disks and the virtual machines running uses around 25W. That equals about 50 euros a year in power if I leave it running 24/7. So it meets the requirements.
Shopping list:
- Asrock N3700-ITX
- PicoPSU 90W
- 80W 12V Leike adapter
- 2x 8GB Corsair Vengance
- Samsung SM843T - 480GB
- Random shoe box I dug out of the waste paper bin
I'm still looking for a nice case to put the board, SSD and two HDDs into. Something the size of an average shoe box would be perfect. If you have a good suggestion, let me know!
17 July 2016
Homelab part 2: router and networking
company makes network devices that can be described as true jack-of-all-trades. Most models they make combine a hardware switch chip with a processor, some RAM and a wireless antenna. Throw in some Linux based software and a GUI with a gazillion buttons and you have an ultimate nerd device. If you want it to be a simple managed switch, it can do that. If you want it to be a router with multiple routing protocols (MPLS, BGP and OSPF, to name a few) it can do that too. Being able to do all I need from my network in a single affordable box is a big plus. Requirement: Hardware reset possible is met by allowing the wife to pull a single plug to reset internet access.
The Mikrotik rb2011uias-2hnd-in:
- Offers 5Gbit and 5 Fast Ethernet ports (plenty for my lab)
- Does NAT routing to the internet with minimal CPU load
- Does DHCP for all the networks
- Hosts some DNS zones for the lab
- Terminates my SSTP VPN tunnels (both for site2site tunnels and remote access when I'm not at home)
- Splits my network into two VLANs: normal network and lab network
- Offers separate SSIDs for normal network, lab network and a guest wifi network that is isolated and has a limited bandwidth
- Routes between the networks
- Creates graphs of the network traffic on every interface
- Firewalls internet traffic based on ports and mangle rules
- Has the ability to run virtual RouterOS or OpenWRT instances (multiple routing instances, yeeh!)
- Has a small touchscreen for quick interface configuration or graphs
- Uses about 10 Watts
So far I'm really happy with it and I keep thinking of new things I can do with it. Next up is trying to set it up as a wireless access point controller. I've been eyeing the RBwAPG-5HacT2HnD, a dual band AC wireless access point to make this work throughout the house.
Subscribe to:
Posts (Atom)